…To be caught up on what’s new here at Everyday Champagne, check out the first ever ‘Fashion Friday’:
…’Sometimes Saturdays’:
…and ‘Same Ole Sundays’:
———–
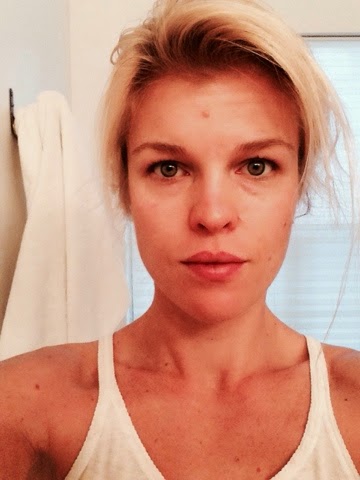
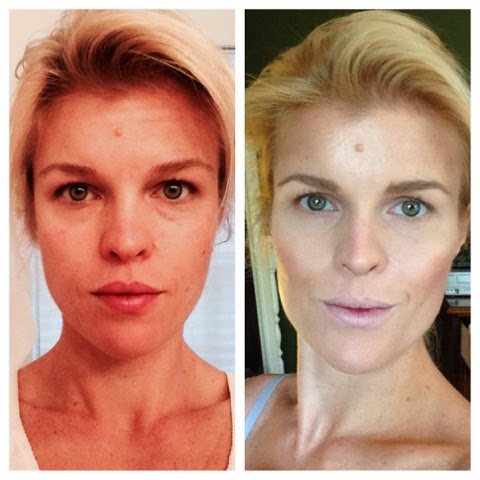
*I have always been prone to face puffiness. I drink a gallon of water a day, eat very healthily, get 8 hours of sleep a night, and yet I still have mornings where I wake up looking like this:
Not one angle on that face. And I swear my sight is compromised when I look like this. It makes me frustrated and oh-so-sad, just longing for my lost cheekbones and adult sized eyes that were there the day before…
Most of the time the puff goes away after my coffee and morning workout, but a lot of times I’m stuck with blowfish face.
Here’s how I hide it:
Start with a clean and moisturized face. (I use Cetaphil Cleanser (or generic brand) and Clean & Clear Dual Action Moisturizer (or generic brand.)
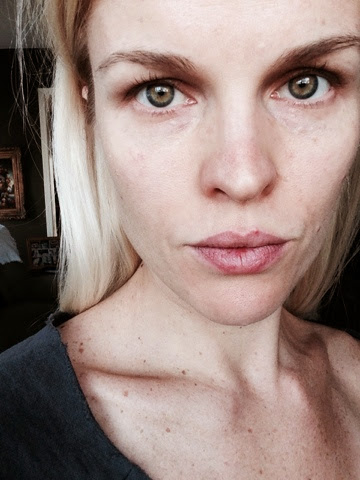
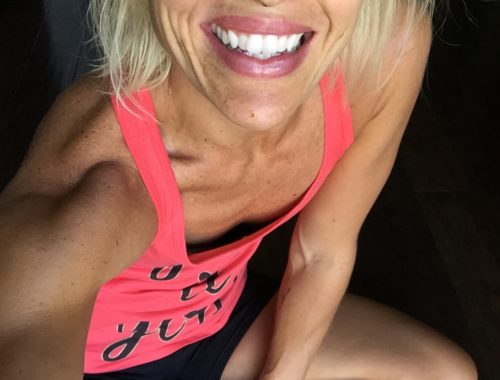
(I think it’s fairly obvious here but there will be no retouching in any of these photos and no filters (that’s cheating!!) – this way you’re able to get the true idea.)
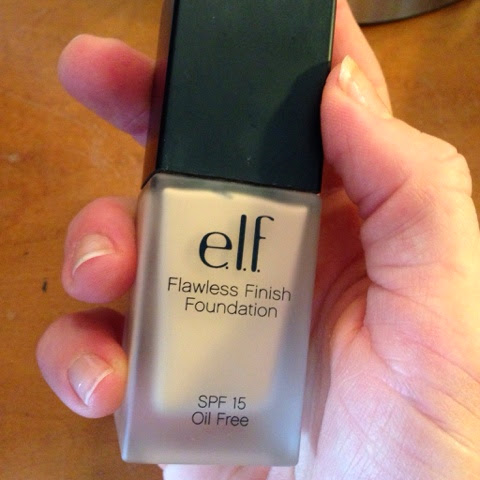
Next, take your favorite liquid foundation, (I prefer liquid formula because I think the coverage is more natural looking than a cream or powder version. Here’s my favorite:
(e.l.f Flawless Finish Foundation in ‘Porcelain’ (I use the ‘Sand’ color when I have some summer color)))
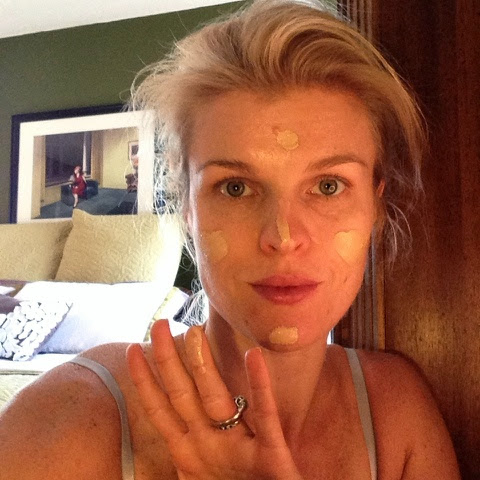
and, using your fingers, dot a small amount on your lower cheeks, forehead, nose and chin.
Rub it in with your fingers, avoiding directly under the eyes and tops of cheekbones because we will be using concealer there later. (I prefer using my hands instead of a sponge or brush because I happen to think it does a better job with even coverage and blending.) But using your hands means you need to be sure to rub it in very, very well- like, it may take multiple tries to get it all rubbed in. You want it to look like your skin, not like makeup.
(You can see I still have under-eye issues because my skin is still bare under there, but my skin tone has now been evened out.)
If you have any blemishes, cover them up with a thick, creamy concealer that matches your foundation and skin tone, or if your foundation is thick enough like mine, just dot more of it on the problem areas and tap gently with your ring finger until it disappears. Repeat with more concealer / foundation if necessary until no more redness is visible.
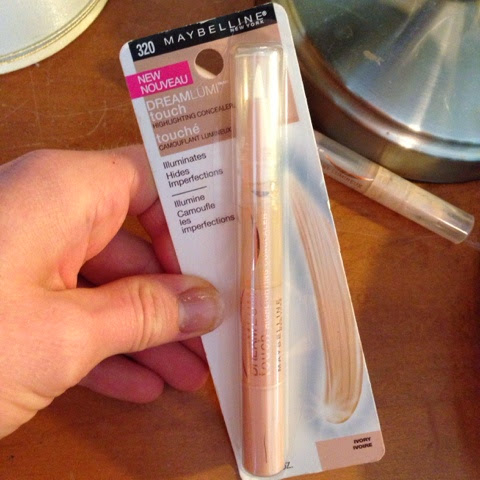
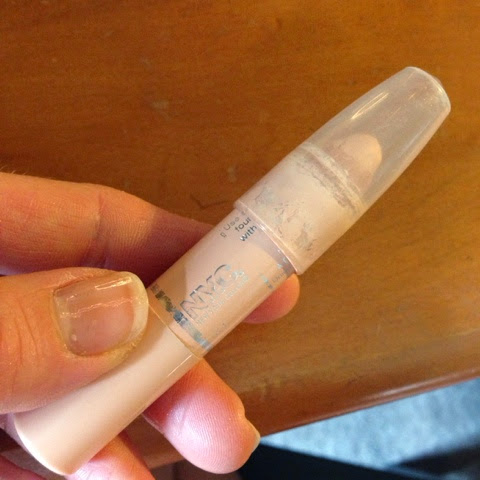
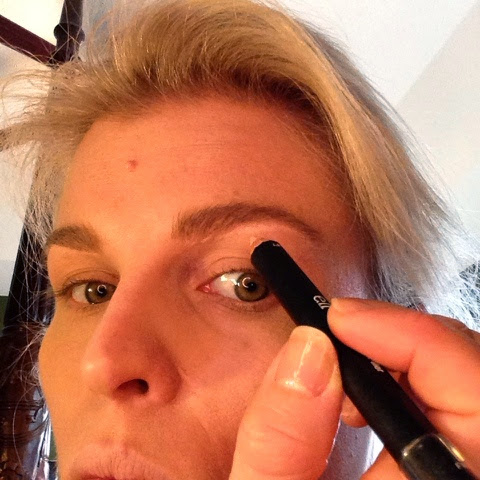
Now it’s smoke and mirror time. Take a liquid concealer, in one to two shades lighter than your foundation/skin color – my absolute favorite is this one:
(Maybelline DreamLumi Touch Highlighting Concealer in Ivory #320)
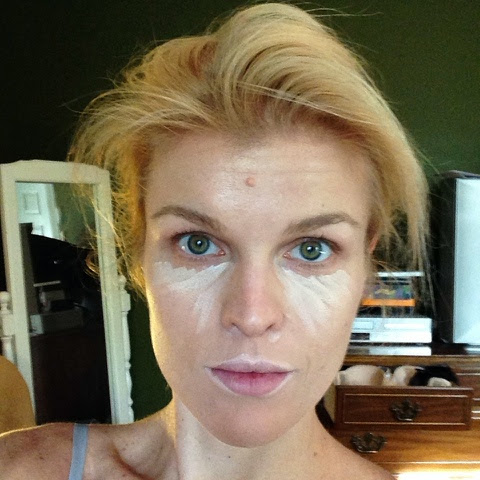
and make your face look like this:
I don’t do the full face contour / highlight game, I know many of you do, but it’s just a bit ridiculous what some people go through to completely transform their face. Although I do appreciate the drama of it all… So when I need a lift, I only do under my eyes (in a triangle shape taken down to the tops of my cheekbones (…or where my cheekbones were yesterday), under my nostrils if there’s any redness, and around my lips.
Blend it in with your fingers, until it becomes one with your skin. Again, make sure to blend this very well so it is absorbed and doesn’t appear cakey. Also- please, please use the ring finger only. It’s the softest of all of your fingers so it won’t pull at the skin on your face and create wrinkles.
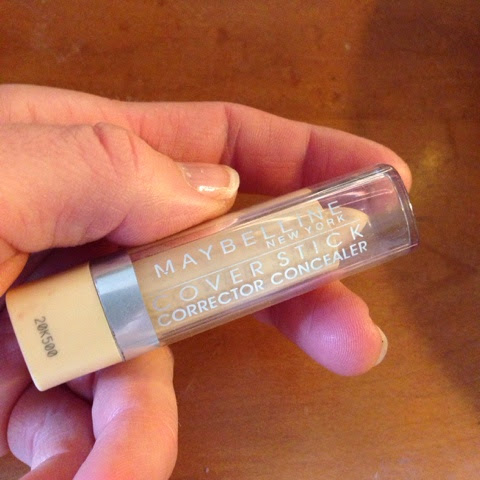
If you have any issues with blue or purple pigment under the eyes (under eye rings/circles), use a bit of a yellow concealer on top (yellow neutralizes the color blue), but only over the discoloration area- not over the full ‘triangle area’. This one is my favorite:
(Maybelline Cover Stick Corrector/Concealer in Yellow)
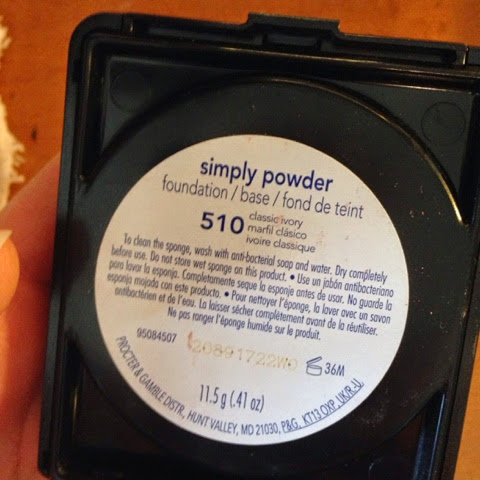
Cover the now concealed eye area with a pressed powder or loose powder either matching the shade of concealer or a translucent one. The pressed powder can be thick and sometimes draw attention to fine lines if you use too much of it, so go light. You just want to set the concealer so it doesn’t run or crease. For pressed powders I like:
(Cover Girl Simply Powder in Classic Ivory #510.)
Next I do my eyebrows. I’m very light and fine haired, therefore my eyebrows are as well. I don’t need to draw a full brow, I do have them, I just need to fill them in a bit.
Here are my favorite brow pencils for blondes:
(The Maybelline Eyebrow Pencil in Blonde (the red one) is the lightest shade and one I’ve been using for years so it’s my go-to, the others (NYX ‘taupe’and e.l.f ‘light’ are still nice for different reasons even though they’re a bit too dark for everyday -the brush is handy in the NYX and the attached highlighter pencil is nice in the e.l.f.))
I just lightly dot with the pencil on the places that are a little bare. No lines- just small dots or dashes.
(Oh, by the way- since you’re now as close to my face as you may ever be- I feel I should inform you that the mark on my forehead, (along with the marks on my left cheek), are not blemishes. They’re, um…they’re…beauty marks. Yes. Beauty marks. Moles are for trolls, witches and boys. Beauty marks are for ladies.)
I also pay more attention to the top of the arc of the brow, as this can make your eyes look larger and more awake. I just barely extend the brow shape up a tad, with the pencil, at the top center of the brow- right at its highest point. But just barely. If you take it too far, you’ve got a perpetual look of shock and horror on your face.
And then I blend with my finger to make sure no pencil lines are visible.
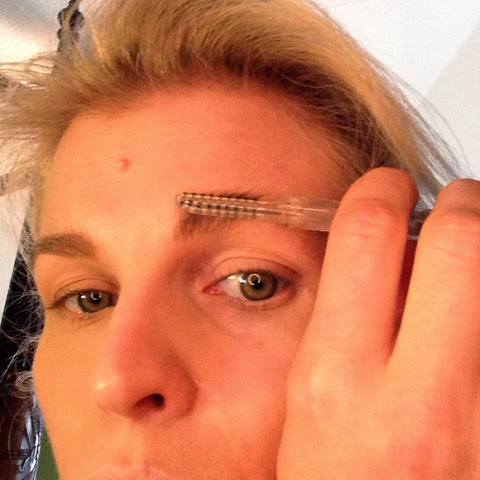
Lightly brush the brow hairs upwards with a eyebrow brush, or a dry and clean toothbrush, to make them appear fuller. You can also just use your fingers for this.
Next I take a very light, flesh colored highlighting pencil, (like the one on the other end of my e.l.f brow pencil, or any type of pencil / crayon concealer works great for this as well:
(NYC in Classic Ivory #960A)
and I lightly trace underneath the brows, not on the hair, but directly underneath,
then blend with my finger. This really makes your brows, and therefore your eyes, pop.
Next, take a matte bronzer in a shade one to two shades darker than your skin – eyeshadows can actually work for this as well, (just make sure there is no shimmer). I have two that I like. One in a cream form and one in a powder form.
Here’s my favorite powder bronzer for contouring:
(e.l.f Contouring Blush and Bronzer in St. Lucia #31111)
(And this is the cream form- e.l.f All Over Color Stick in Toasted. And it’s what I’m using below.)
Apply lightly underneath the cheeks and at the sides of the forehead, at the hair line, avoiding the center of the forehead.
Now blend it in using a circle motion with your finger tips. (If you used powder bronzer, use a large brush for blending.)
(Hey! I see a cheekbone! Nope. Fooled you.)
The next step is optional and totally dependent on what type of face you want for the day. You can absolutely stop here and proceed to eyes and lips. This would be a perfect base if you were keeping it all very simple or doing a bold lip and a light eye. Or…if you decide you want to play up your eyes more and keep your lips light – add some blush. The rule is pretty simple- keep your face fairly bare if you’re doing a strong lip, but a smoky eye and pale lip welcome, and often need, a soft pop of color on the cheeks.
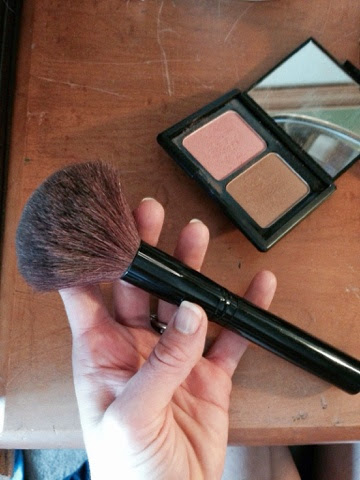
My favorite pink hued blush comes in the e.l.f palate I showed you above. It isn’t too bright, and is perfect for my light skin. I tend to look like a doll if I have too much color on my face because my face is round and my eyes are on the smaller side, so I always use a very light shade on my cheeks. And I like this brush for applying it:
(e.l.f Blush Brush. No I do not work for the e.l.f company.)
Where you apply your blush depends on your face shape. Here’s where mine goes:
(Pic taken before blending!)
I apply mine right under my cheek bones. And this, honestly, took years before I got it right. Even with all the ‘experts’ telling you where you should put your blush, only you know. And you know only after you play and make a lot of mistakes.
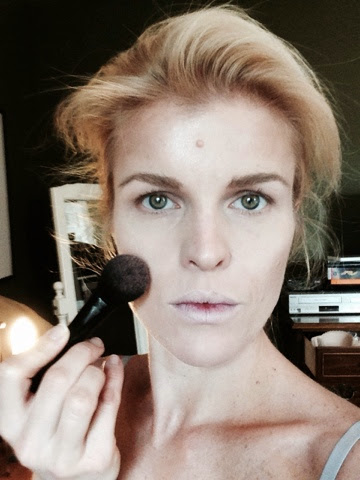
Blend it in using a large powder brush. Here’s my current favorite:
(This, I believe is actually Target brand and I’ve had it for years. But e.l.f makes a good one too. It just needs to be extra, extra large and fluffy.)
I like to squish mine with my fingers a bit to concentrate the bristles so they work harder to blend:
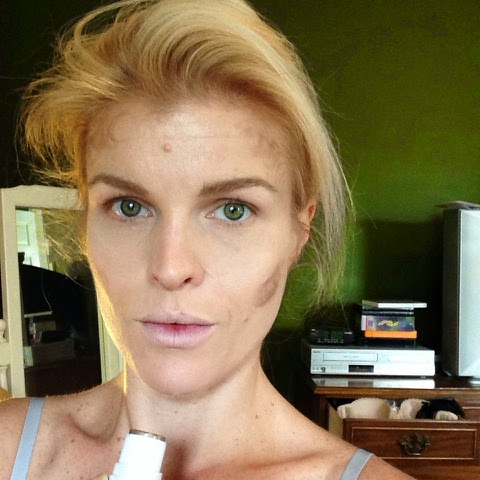
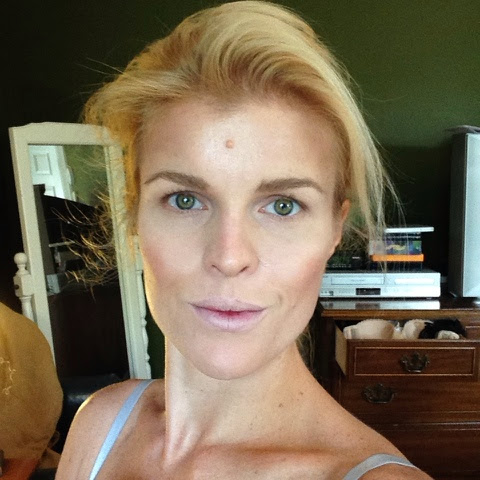
Now you’ve got a flawless, still natural looking face with some structure and a bit of a glow. Many, many miles away from where we started, I’d say!
(Before you start calling me a liar, these photos were taken in different lighting due to the slight difference in time of day from when I started to when I ended, so hopefully you still see the point. But I assure you- No retouching and no filters were used!)
Next ‘Makeup Monday’ will focus on one of the next steps – eyes and lips!


No Comments