I threw my daughter an Elmo birthday party yesterday at our house. It was one of the most fun parties I’ve planned and I’ve been sitting here trying to figure out why. It could be that I decided this past year, while I was planning my 5 year old’s Curious George party, that I needed to stop stressing out about my parties, (about most things actually). So I wasn’t stressing out and letting the planning of this party bring me down. It could be that I’ve already thrown an Elmo party once before, when my son was 1, so I already had some recycled ideas to build off of. It could be that I know this is the last 2 year old party I will be throwing for my children so I wanted to enjoy every possible second of it. Or it could be that an Elmo party, for really young kids, is just super easy to do. Whatever the reason, it was fun. It was fun planning it, it was fun watching my daughter’s face as she saw everything for the first time, and it was just plain fun being at my party.
I have so many things to talk about in regards to my daughter’s turning 2, so many pictures to share and memories to talk about, and I don’t think I can fit it all into one post. So here’s what I’ve decided: I’m gonna share all the party info in this post, and save the sentimental stuff for another time. Her birthday isn’t until next week so I’m thinking I have some time before I completely lose it.
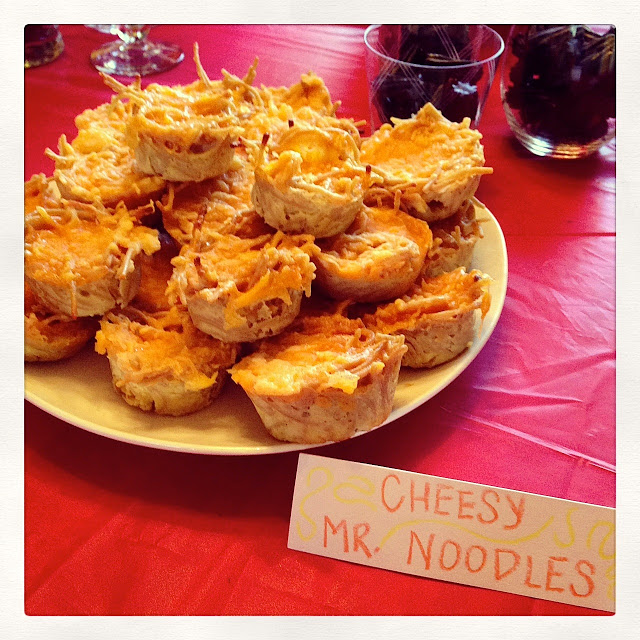
Since I’m a cook at my core, I usually approach my parties from a food angle. It always begins with the food for me. I also like to name my food offerings something that ties into the theme of the party. For this Elmo party I made a large batch of macaroni and cheese, using spaghetti noodles instead of a short cut pasta, and baked them off in muffin tins so they were party sized. I called them ‘Cheesy Mr. Noodles’. If you’re familiar with Elmo’s World, Mr. Noodle is his friend, and he is, in fact, quite a cheesy guy.
 |
| I also like to label my food. I just used crayons to make the labels since that’s what Elmo would do! |
I also made meatballs, Moroccan in style, and called them ‘ElMoRock ‘n’ Rolls’ (Elmo Rock ‘n’ Rolls / Moroccan Rolls). I served them with some homemade peach chutney and parker house rolls. (Meatball recipe at bottom of page)
 |
| I put our stuffed, guitar-playing Elmo on the table by the dish and it’s name card in case the name was lost on anyone. |
I made a fruit tray and laid out the fruit to look like Elmo’s face. I used two white ramekins filled with agave-sweetened greek yogurt as the eyes, blueberries as the pupils, sliced cantaloupe as the nose, blackberries as the mouth, and strawberries as the face.

I made some of my homemade fruit gummy snacks using berry and apple shaped ice cube trays and served them along side of the fruit tray with a sign that said, ‘Elmo says eat your fruit!’

I always like to have adult beverages for the parents at my birthday parties and usually do some sort of cocktail with a theme name. This time I made sangria and called it ‘Elmo’s SongRia’.

I had a bucket with some beer, sparkling water-sodas and bottled water as well. The bucket is from The Dollar Tree, as are the cups, napkins and these special Elmo juice boxes.

As far as the table decor, I always like to decorate with food. I don’t like single use objects so I’m always trying to re purpose things or use something that’s edible as well so nothing is really ‘wasted’. I usually like decorating with different colored candies that tie into the color scheme of my party. My colors for the party were red, yellow/orange and black just like Elmo’s features. So I bought some yellow colored pineapple licorice bites, black licorice bites and red Twizzlers from The Dollar Tree and put them in different sized glasses, vases, etc. I also put goldfish in glass bowls on the table as well, because again, if you watch the show you know that ‘Elmo loves his goldfish…’
 |
| In the far background you can see a canister of hand wipes that I picked up from The Dollar Tree with Elmo’s face on it, plus a bottle of hand sanitizer that I feel are both extremely necessary at kid’s birthday parties. The Elmo party hats next to them came from Party City and were leftover from my son’s 1st Elmo party. |

As far as the rest of the decorations, I blew up dozens and dozens of balloons in different shapes and sizes and just scattered them around the house. Every kid loves playing with balloons and they’re cheap and easy. I do this for all my home birthday parties.
 |
| balloon sword fight… |
I hung streamers (from The Dollar Tree) in the colors of the party from the archway that leads into the dining room where all the food was. And by I, I mean, my husband.

This was a big hit because the kids just wanted to walk in and out of the doorway and then, eventually tear them down…
 |
| balloon hats… |
…and then eventually wrap themselves in them and play monster…which also fit into the theme of the party 🙂
 |
| Meet Monster Miles. Grrrrr. |
In the dining room I tied 2 large Elmo helium balloons to the curtain rods. These were also from The Dollar Tree.
 |
| Sorry for the bad photo, the lighting was super bad in here! |
In the kitchen I had the dessert table…
 |
| Plates, forks and birthday candle from D.T. and napkins from Party City leftover from years ago. And Reese’s pieces are in the bowl. |
I made Elmo cupcakes using dyed red icing, large marshmallows, cut in half around the center as the eyes, small brown m&m’s as the pupils, an orange peanut m&m as the nose and an oreo cut in half as the mouth. I had all of those components already on hand, leftover from Christmas candy, or my pantry, etc. To make Elmo’s fur look realistic, the best way I could find to do it was with my finger after the icing had hardened slightly in the fridge after decorating. No need to pipe the icing for the fur…it would be a waste of time!!

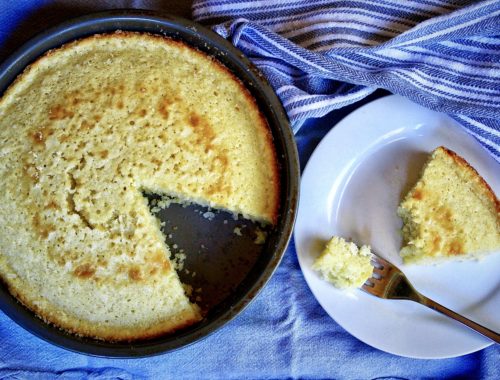
I also made a cake. I used my recipe for Chocolate Peanut Butter Cake (because my daughter loves those flavors) and instead of the second and outer frosting being a chocolate one, I kept it as a simple cream cheese frosting (see my recipe here) so I could dye it red. (The cake still had a peanut butter-cream cheese frosting layer in the center.) (Oh, and please keep this in mind when you’re dying icing the color red- You will need double the amount of food coloring that you thought you needed. Seriously, you won’t believe how much food coloring is needed to make a deep red. And always, always use gel. Liquid color thins out your frosting too much.)
 |
| It has its flaws, but I loved every part of making this cake! And at the end of the day, who wants to be perfect if it means you’re not having fun anymore? |
I frosted the cake with my dyed cream cheese frosting first, then used my finger again to make the fur. I had previously frosted two white cupcakes (taken from the batch of cupcakes above) to be the eyes and carved another one to be more oval, then frosted it orange for the nose. Getting the frosted cupcakes onto the frosted cake was a challenge and required a lot of patience and steady hands. I used two forks to carefully place them. (And I recommend reserving some extra white and colored icing to cover any holes or nicks made in the transfer process.) Since the cake was peanut butter/chocolate flavored, I used Reese’s Pieces as the pupils and the mouth. **I decorated this cake the night before the party and I do not recommend adding the Reese’s Pieces until right before the party because they will bleed!!!!
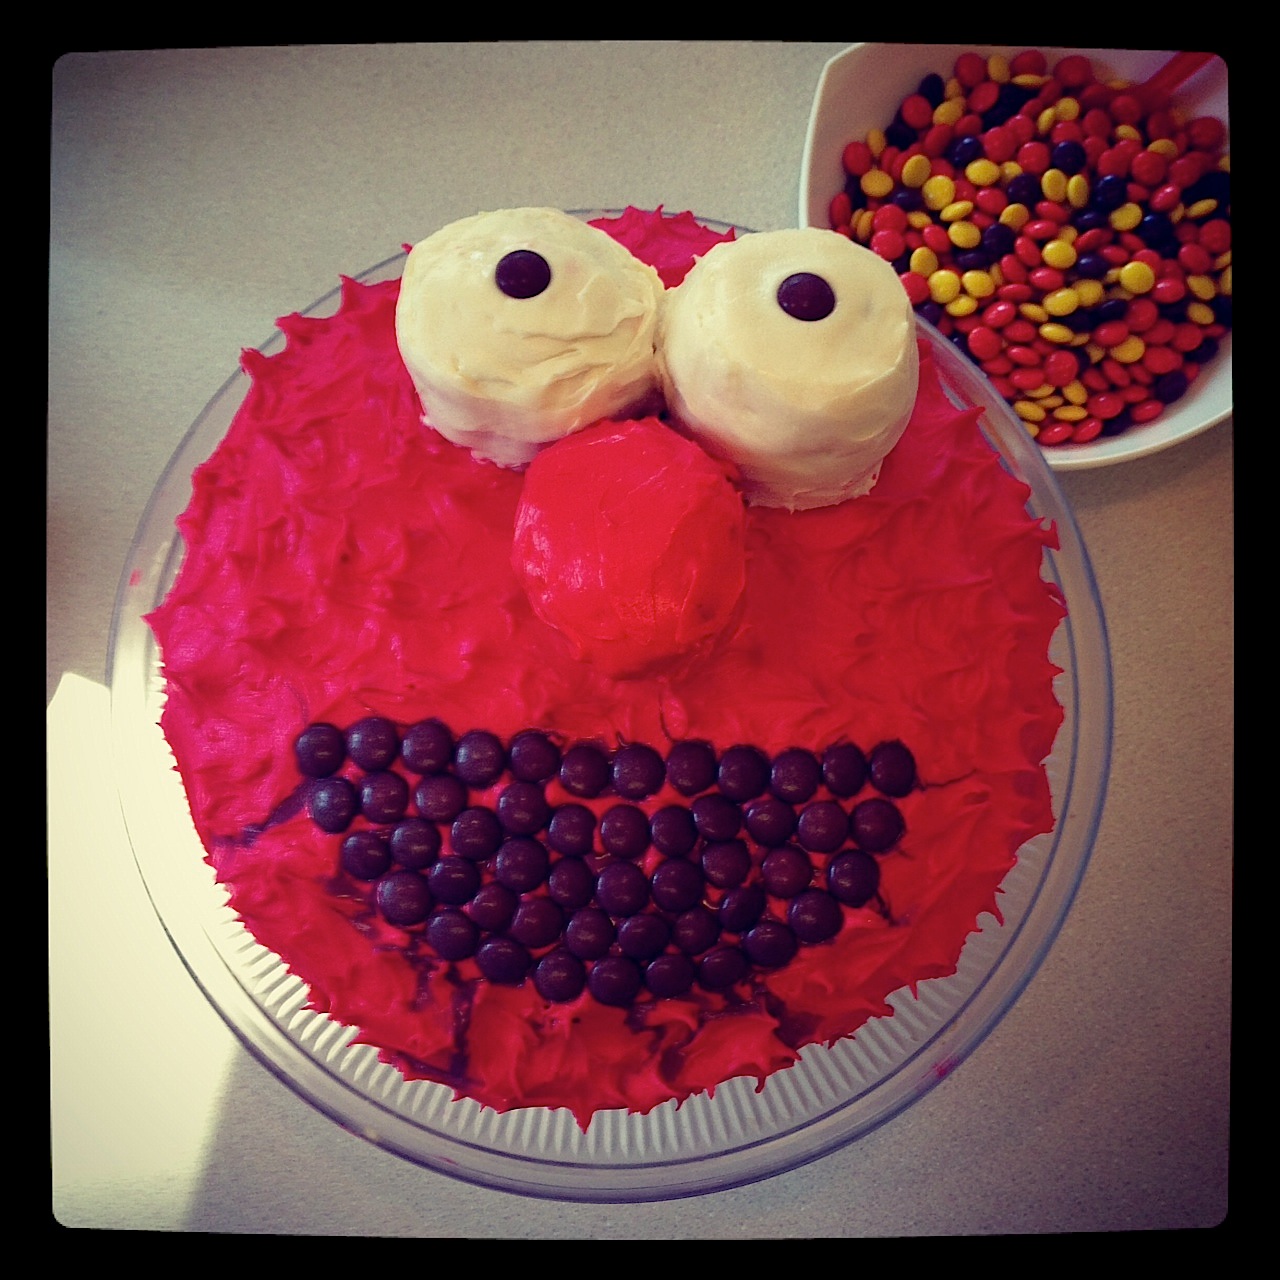 |
| Meet Rabid Elmo. |
If this happens, you will need to rely on extra red frosting that you hopefully saved in case of emergency. Also, a dry paper towel used as a blotting device helps as well.
As for entertainment, I like to keep it pretty simple because I think young kids don’t need a lot of organized events. Remember, the balloons and streamers were kind of a game themselves! I just laid out a large box of crayons (from D.T.) and some Elmo coloring pages I printed for free online from the Sesame Street website.)

On another table I laid out extra Elmo facial features from when I was cutting them out for the favors (below) because I didn’t want to waste any paper! For the red Elmo faces, I just traced around a small, ceramic bowl I had with ridged edges but I think a plastic food storage container lid would work well too.


As for the party favors I decorated red buckets to look like Elmo. I used the same facial feature cut outs as above and everything was traced using something I had in my kitchen junk drawer. The white eye balls were traced from the lid of a small jar and colored with a black sharpie, the orange noses came from an oval shaped tablespoon, and the black mouth was free hand.

Inside each red bucket/party favor was an Elmo activity book, a box of crayons and a small bag of Goldfish crackers because…’Elmo loves his goldfish, his crayon too!’
 |
| Red bucket, crayons and activity book all from D.T. Goldfish from Target, 8 to a pack for around $5. |
Super simple, not too junky, educational and the bucket is reusable!
All in all, the party was a big hit and I spent hardly any money because I relied on what my local Dollar Tree had to offer and what I already had at home. The most important part of throwing a successful party is making sure you, the host, are having fun because you’re responsible for setting the tone for the party. So when you become stressed out, your guests will as well. So pour yourself a drink, in my case it was some Elmo’s SongRia, and sit back and watch your guests have fun with what you created. Remember that it’s a PARTY. It’s supposed to be FUN!
The one guest I’m not sure had the best time may have been Elmo himself…an hour and a half into the party I walked in and found him like this:

And then later, poor guy, this happened:

But this may be the worst of all. After everyone left and the place was cleaned, I found this in my trash can:

I’m sure I’ll post more pictures from the party soon, but first, I’m gonna enjoy my one year old for another week.


Happy (almost) Birthday, Lennon Maie, the smartest girl I know!

ugh. (sniff, sniff) so much for not losing it.
*Easy Moroccan Inspired Meatballs
(makes roughly 56 small meatballs)
(this is from memory so the measurements are estimated because I was just winging it. I recommend when you’re making meatballs, that after you season them, roll a tiny ball and cook it in the microwave to check your seasoning before cooking them.)

In a large mixing bowl combine the following:
-2 pounds of lean beef (or any other ground meat)
-about 1 cup of fresh bread crumbs
-half cup of coarsely ground almonds (some large pieces are OK and add a nice textural component to the meatballs)
-1/4-1/3 cup of ketchup OR 1 small can of tomato paste and about 1 TB of brown sugar
-3 large eggs
-large handful of fresh cilantro
-lots and lots of kosher salt
-maybe 1 TB+ of ground cinnamon (this is the predominant flavor)
-about 1 tsp of granulated onion
-about 1 tsp granulated garlic
-good pinch of crushed red pepper flakes
-about 2 tsp total of a Caribbean or jerk spice blend, even Chinese five spice would do because the flavors used all contain some similar elements like thyme, allspice, nutmeg, ginger, coriander, fennel, cloves, etc.) If you don’t have a spice blend like those on hand, use some of the elements I listed.
Mix well but not overly so. Just get the ingredients equally distributed. Check your seasoning by microwaving a small amount and tasting it. Roll into golf ball size balls. Place on a greased, foil-lined cookie sheet and bake at 350 for 20-25 minutes, or until firm to the touch. Allow to cool before storing if you’re making them ahead of time. Serve warm on their own or with my homemade peach chutney and your favorite roll if desired.

No Comments