
Promoting anything other than kindness and humanity right now feels strange. But as a kind human, I just want to remind everyone that we are all capable of compassion and empathy and grace towards those we come in contact with during any type of hardship or great devastation. That can be harder to find when the world feels like it’s upside down and falling apart… But it’s still inside all of us. So let’s not forget that when you see people whose job requires them to publicly do, or share something else during times like these. Let us not leap to judgment. Sharing something unrelated, or even something positive, does not take away from the tragedy. And it doesn’t mean they’re ignoring it.
It just means that it takes a lot to be a human, and we are all trying our best to move through the world.
Everyone processes grief of all kinds in many different ways, and not everyone has the capacity to verbally express their feelings in the same manner as others. Some people go inward when they’re scared. Some scream out. Some deflect.
It’s all ok; we are all differently the same.
So let’s all try harder to allow space for each individual to do what they need to do in order to pass through.
And continue to put out what we wish to breathe in.
x x x
October brings a lot of joy into my heart. Lately that joy has been harder to access because of the news we are waking up to every morning, but generally speaking – October is lovely in my book. And it’s just plain hard not to correlate the month with chocolate. So I thought the timing seemed relatively fitting to share this decadent DIY peanut butter cup recipe.
A lot of you may wonder why anyone would want to make their own candy when it’s just so damn easy to find. It sure as hell isn’t cheaper to make it yourself. It’s not taking up less time. There’s nothing efficient about it. It’s messy as all get out. But it is quite satisfying to build something on your own, or with your loved ones… and even more delicious. Plus, the bonus is that when you do make your own versions of store-bought or restaurant items, you’re putting yourself in the drivers seat and can control all the moving parts.
Not a sweet sweets person? Great! Don’t add a sweetener. You like your sweet things extra salty? Perfect; you can control that. You’re more of a milk chocolate individual and don’t vibe with the dark / semi sweet chocolate? No prob. Change it! You’re team Crunchy vs. Creamy? Get you some.
And if peanuts can kill you, use another nut butter!
or maybe you just skip this one.
The only thing you can ‘mess up’ with this recipe is making your chocolate layers too thick, creating a harder-to-bite-down-on chocolate layer. I’ve done it and it’s not the end of the world; it’s still gonna taste great. But that’s really all that can go ‘wrong’ here. And since melted chocolate is a pain to measure, just know that each candy will likely be slightly different… and that’s ok!
All that being said, I pinky promise these will not turn out wrong.
So say your version of a prayer to those who need it, donate your money or your time, grab someone close by that you love (maybe that’s only you today) and get messy.
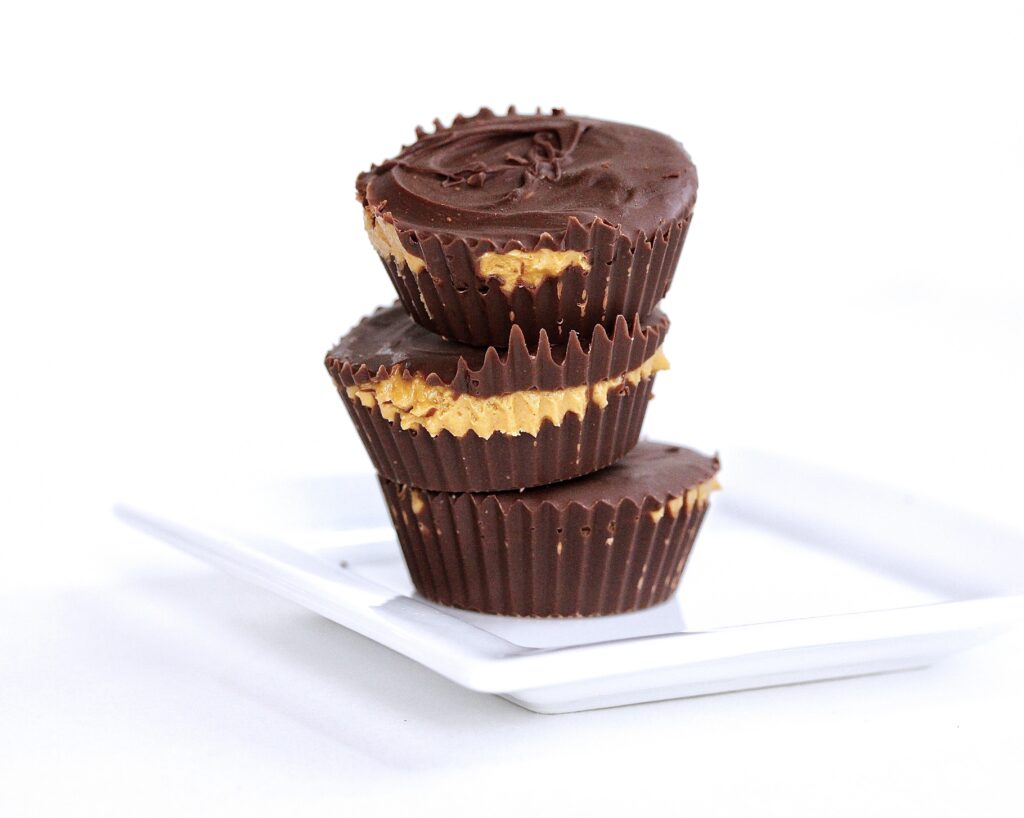
DIY Dark Chocolate Peanut Butter Cups
(Can be adapted to make smaller sized cups if you use a mini muffin tin instead; simply eyeball the layer measurements below to accommodate.)
You will need :
- 1 (12 ounce) bag semi sweet or bittersweet chocolate morsels or chunks + 1/2 cup
(your choice how dark you want them!) - 6 TB coconut oil
- 1/2 cup smooth natural peanut butter
- Kosher salt to taste, if desired, but especially needed if your PB is unsalted
- Sweetener of choice, if desired
(-maple syrup, honey, coconut sugar, light brown sugar… just note that the liquid sweeteners create a sightly looser filling.) - 2 TB coconut flour
*if you happen to have leftover ingredients, that’s your cue to lick the bowl.*
You will do :
Fill a standard sized muffin tin with 10 muffin liners. Silicone makes it a bit easier to handle.
In a double boiler, or safely in the microwave, melt the chocolate morsels or chunks.
(*tip for not scalding the chocolate in the microwave – reserve about 1/4 cup of the chocolate to stir in once the rest has been completely melted. This will ensure the mixture will not seize up / become lumpy from too high of a heat too quickly.)
Pour about 2 TB of the melted chocolate into each muffin liner, creating a layer on the bottom and up the sides.
To do this easily, you can move the pan around to swirl the chocolate up onto the sides of the liners, or you can use a pastry brush to paint it.
Place the muffin tin in the freezer for about 15 minutes to set up while you prepare the peanut butter filling.
Place the remaining melted chocolate mixture somewhere warm to stay loose – that could be in the still warm microwave, or back onto your double broiler with the heat off.
In a medium mixing bowl, mix the peanut butter with the coconut flour (and the salt and/or sweetener, if using).
(If your peanut butter is overly thick and lumpy, you can thin it out slowly in the microwave on the defrost setting; stirring in between every several seconds or so until it’s a workable consistency. Then stir in your coconut flour until you have a smooth mixture.)
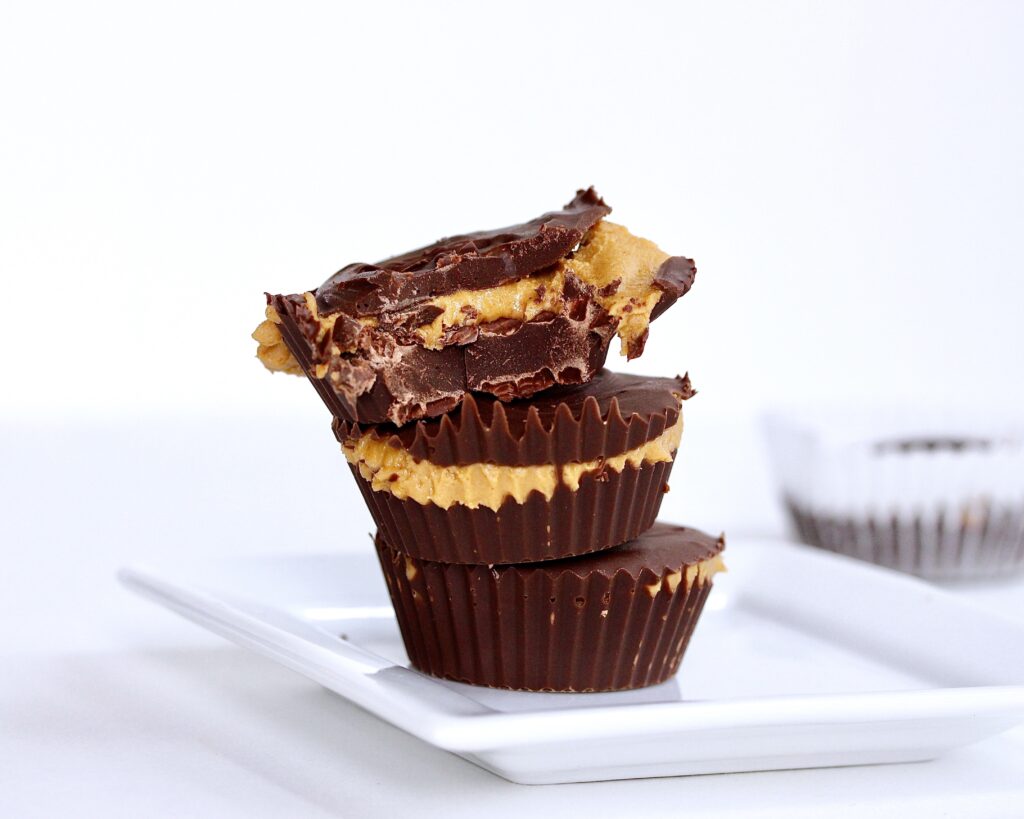
Remove the muffin tin from the freezer and spoon about 2 TB of the peanut butter mixture into each prepared chocolate lined cup. Smooth it out to evenly coat the chocolate layer.
Place the tin back in the freezer for another 15 minutes.
Remove from the freezer and pour more chocolate over the top of the peanut butter to cover… it’s roughly 1 more TB.
Use the back of a spoon to spread it to the edges, if needed.
Sprinkle with flaky sea salt if you’re extra salty 😉
Place in the fridge for about 30 minutes to set (you could also go back in the freezer for 5-10 minutes.)
Once the top layer of chocolate is completely hardened, remove from your tins and enjoy!
thanks for reading, ya’ll . much love x
No Comments