
Look, we all want that Norman Rockwell painting for Thanksgiving- it’s engraved in our brains. The entire, extended family gathered around the dining room table, silver platters and crystal glasses strategically placed about, larger than life golden brown turkey waiting to be carved by grandpa… It’s the vision. It’s the dream. It’s what we’re trained to think HAS to happen every year. But here’s the thing…sometimes it just can’t. Sometimes it’s just gonna be the 4 of you and you just want something simple, and quick (possibly different?), without compromising any of those traditional flavors you look forward to once a year.
This entire meal I’m about to show you is edited down drastically from the usual Thanksgiving spread. And it’s designed to be the perfect meal for a small gathering, for the cook who doesn’t want to, or simply cannot cook for hours. This whole thing can take you 1 hour to cook everything…ONE HOUR, which is pretty darn impressive for an entire turkey. You can add items to it to round it out, obviously, but essentially you have the flavors and textures we all want in the Thanksgiving meal- Savory, creamy, salty, crunchy and sweet. And it only took 3 items to get you there. Plus! You’re getting gravy by not having to pull out the whisk or any separate pot. No flour, no butter, nada. (Since, I know most of you are gravy-phobic.)
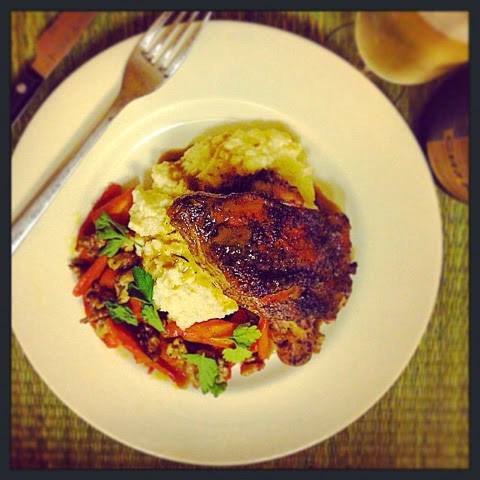
It’s the edited down version that will leave you completely and utterly satisfied.
So, if you’re in a bind this year, don’t think you can’t cook the meal just because you don’t have the whole day (or day before) to prep and cook. Don’t think you have to cook the bird whole just because some painting or drunk uncle told you so. This braised turkey right here tastes better than any whole bird piece I’ve ever had. No lie.
I wanna earn that turkey coma, baby.
 |
| (serves 4-6) |
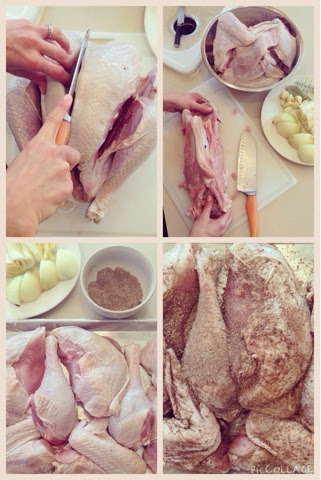
Next you’re going to lay your turkey pieces out on the cutting board or large pan and season them liberally, all over, inside and out of the skin, with the following spice rub-
4 tsp kosher salt
4 tsp ground fennel seeds
4 tsp onion powder (NOT onion salt)
2 tsp black pepper
2 tsp ground allspice
Next, we sear. Take your giant roasting pan and put it on your stove-top. (Yep, it can totally go there.) If you have the one large burner that holds a griddle, use that, if not then take up two burners. Turn them on high. Once the pan is nice and hot, drizzle with a little canola oil and place your seasoned turkey pieces, skin side down, onto the pan. Arrange them in a single layer and do not move for 3-5 minutes. You know they’re ready to flip when you go to move one and they do not stick to the pan, and are a deep, golden brown.
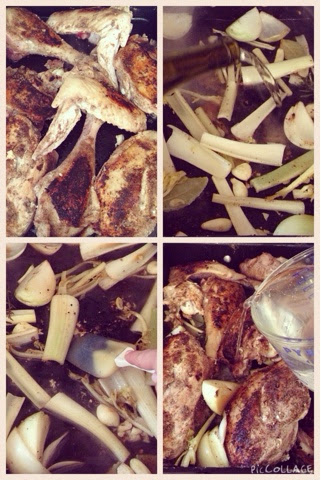
Flip and sear on the other side as well, then remove and add in the following aromatics:
1 large onion, quartered
5-7 stalks of celery, halved
handful of whole, naked garlic cloves
Place you turkey pieces back in the pan and pour in 1 quart (4 cups of water). The water should come to about 1/3 of the way up the turkey pieces. Season everything with a little more salt (you can always add more later if need be.)
Then…place the pan, uncovered in a preheated 350 degree oven for one hour.

(note- if you want to have this part done far in advance, after cooking, just cover tightly with foil and leave in a low, warm oven for several hours.)
Remove your pan from the oven, take out the turkey pieces and leave the aromatics and liquid. Turn your burners back on high again and boil the liquid down until you get a thick ‘gravy’. Taste to check seasoning, adjust if necessary. Strain it and pour the liquid only into whatever you plan on using to serve your gravy. (Add in chopped giblets and boiled egg if you roll that way.)
DONE.
Now, while your turkey was cooking, you would have made the Buttermilk-Chevre Whipped Root Vegetables…
You need 1 (2 lb) rutabaga, peeled and diced
2 large parsnips (1 lb total), peeled and diced
2 small-medium starchy, Idaho potatoes (1 lb total), peeled and diced
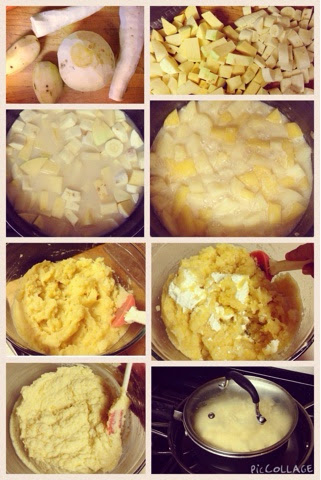
Place your diced veggies in a large stockpot with 2 cups buttermilk and 1 quart (4 cups) chicken or turkey stock. Bring to a boil, reduce to a simmer and continue to simmer, uncovered for 45 minutes or until they’re fork tender.
Strain and using either a ricer, potato masher, food mill, or even immersion blender, mash the veggies until they’re as smooth as you want them to be.
Stir in 5 ounces of young goat cheese (chevre) and 4 TB of unsalted butter.
Adjust seasoning to your liking- adding more kosher salt and white pepper.
Keep warm by placing them in a stock pot with a lid, set inside a larger pan/pot with enough water to come up about 1/3-1/2 way up. Turn the burner on low. This will keep the mash warm but not dry them out until you’re ready to serve.
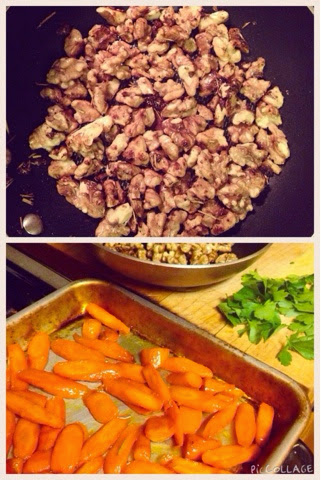
As for the Maple Glazed Carrots…you can do these ahead of time, during the turkey cooking, or while everything else is staying warm and/or the turkey is resting. The carrots cook at a higher temp than the turkey does, but you can absolutely cook these at the 350 degrees at the same time with the turkey, and just cook them for longer. It’s totally up to you, depending on the time you have!
Peel and slice about 2 lbs of carrots, on the bias and place on a cookie sheet. Cover with canola or olive oil and season with kosher salt.
Roast at 425 degrees for 30-40 minutes (OR at 350 for the hour the turkey is in there!)
They’re done when they’re fork tender and have begun to brown on the edges.
Drizzle all of them with good quality (REAL) maple syrup to coat and a couple good pinches of ground ginger, then place them back in the oven for about 5 minutes to caramelize.
Remove and serve with Rosemary-Candied Walnuts (recipe below) and whole parsley leaves.
(These nuts can be made days in advance and kept room temperature as long as they’re in an airtight container.)
DONE. Happy Thanksgiving to ya!!
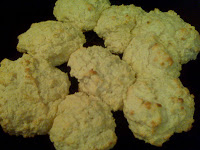
What to serve for dessert?
Try my Cream Cheese Pumpkin Pie

My, how resourceful you were.
No Comments